How AI Actually Cleans Your Hard Drive : The Two-Step Digital Audit
We’ve all been there: you finally find that old external hard drive, plug it in, and realize it’s a digital junk drawer. Maybe you’ve already used a tool to delete the obvious duplicates, but you’re still left with empty ballast—nested folders that lead nowhere, ancient system logs, and a file hierarchy that makes no sense.
In 2026, you don’t need to be a systems administrator to fix this. You just need a “Digital Architect” to write you a custom cleanup plan. Here are the two most secure and accessible ways to do it.
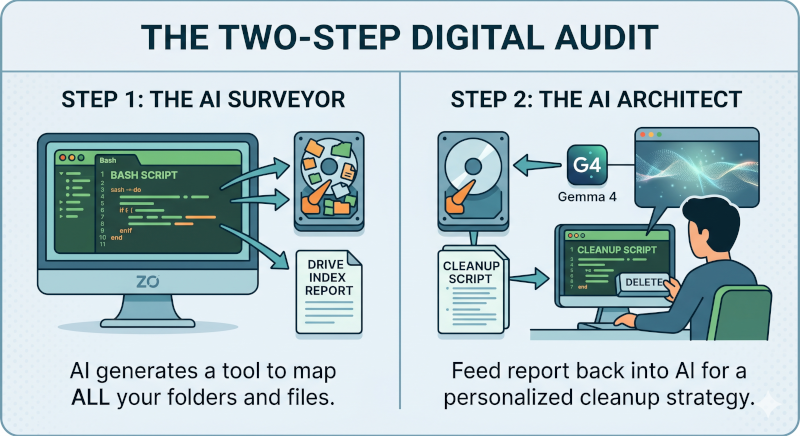
Step 1: The AI as your Surveyor
You don’t start by telling the AI what’s on your drive—because you probably don’t know yourself! Instead, you ask the AI to write an Indexing Script.
- The Request: You tell your AI (ZO or Gemma) which Operating System you are using (like Linux, Microsoft or Windows).
- The Tool: The AI generates a specialized script (Bash or PowerShell). You run this script locally on your machine.
- The Result: This script “crawls” your entire external hard drive and creates a comprehensive report of every single folder and file, including their sizes and dates.
Step 2: The AI as your Architect
Now that you have a “full view” of your digital attic, you feed that report back into the AI. Now, the AI isn’t guessing—it’s looking at the exact blueprint of your data.
- The Analysis: The AI identifies the patterns. It spots the temporary cache files you don’t need, the “Project_Final” folders that are actually empty, and the messy “New Folder (99)” structures.
- The Master Plan: It writes a final Organization Script. This script is designed to move, rename, and prune your drive exactly how you want it.
- Human Control: You review the script, hit “Run,” and watch your drive transform. You remain the one with the “Delete” key.
Two Ways to Run the Audit
1. The ZO-Computer (Personal Cloud Power)
The ZO-computer is a private, intelligent server in the cloud. You don’t need to install anything; you just open your web browser.
- How it works: You use the ZO-computer’s browser interface to generate the surveyor script and analyze the results.
- Privacy: Because it’s a private personal server, your file names and structures stay in your dedicated vault. It’s the easiest way to get professional-grade results without a complex setup.
2. Gemma 4 (The Local Sovereign)
If you want the ultimate level of privacy, you can run a model like Gemma 4:E4B fully locally. We use Gemma as the prime example because it is perfectly balanced—small enough to run on a standard laptop (like a ThinkPad T550) but smart enough to write complex system scripts.
- How it works: Using a tool like Ollama, you run Gemma directly on your machine.
- The Benefit: Zero data leaves your computer. Since it’s fully local, the conversation about your files happens entirely offline. It is the gold standard for digital sovereignty.
One Strategy, Any Language (Mostly)
Whether you are using the cloud-based ZO or the local Gemma, they can “speak” the language of your specific computer:
| OS | The Scripting Language |
| Linux (Ubuntu) | Bash (.sh) — The native choice for ZO-computer users. |
| Windows | PowerShell (.ps1) — Handles complex Windows system file permissions. |
| Mac (macOS) | Zsh — Tailored for Apple’s modern file systems. |
A Note on ChromeOS: While great for browsing, ChromeOS is a “locked” system. It doesn’t allow the execution of these deep-cleaning scripts on external drives. For this level of organization, it’s best to plug your drive into a Linux, Windows, or Mac machine.
Taking it to the Next Level: The “Hands-Off” Autonomous Cleanup
If the “Two-Step Audit” feels like too much manual work, there is a third, more advanced path. By combining a local brain like Gemma 4 with an agentic tool like OpenClaw, you can move from “AI as a consultant” to “AI as an operator.”
How it Works: The Brain Meets the Hands
While Gemma 4 provides the logic and reasoning, OpenClaw acts as the “hands.” OpenClaw is an open-source agentic framework that can run locally on your machine.
When you link the two:
Direct Interaction: Instead of writing a script for you to run, Gemma 4 sends commands directly to OpenClaw.
Autonomous Execution: OpenClaw can browse your external drive, analyze file metadata in real-time, and execute organization tasks (moving, renaming, deleting) without you having to copy-paste a single line of code.
Real-Time Problem Solving: If OpenClaw encounters a system error or a locked file, it asks Gemma for a workaround and tries again. It’s essentially a “Self-Driving” cleanup.
⚠️ Proceed with Caution: The Risks of Autonomy
As powerful as this “Local Agent” setup is, it comes with significant risks. When you give an AI the power to move and delete files autonomously, you are handing over the keys to your digital kingdom.
The “Context” Gap: AI is smart, but it doesn’t know your life. It might see a folder named tmp_09_2023 and assume it’s ballast, not realizing it contains the only copy of a project you spent months on.
Irreversible Commands: If an agent executes a rm -rf (recursive delete) command on a folder it misinterpreted as “empty,” that data is gone. Most cleanup scripts don’t move files to a “Trash” bin; they erase them to save space.
Permission Overreach: If you give OpenClaw administrative (sudo) access, a small logic error in the AI’s reasoning could lead to it modifying system files instead of your external drive.
The Golden Rule: Never run an autonomous cleanup with OpenClaw and Gemma unless you have a verified backup of your drive elsewhere. This setup is for the bold—it’s high-speed and high-efficiency, but only as safe as your last backup.
The Bottom Line
Stop treating your hard drive like a junk drawer. By using a Two-Step Digital Audit, you let the AI do the heavy lifting of mapping and planning, while you keep the final authority. Whether you choose the browser-based ease of ZO or the total local privacy of Gemma, your digital space has never been clearer.
Ready to start? Ask your AI to “write a script to index my external drive” and take the first step.